- Introduction
- Adding JTestConnect to your project
- How to Annotate Your Classes
- Configuring JTestConnect
- Building JTestConnect from source
Adding JTestConnect to your project
JTestConnect is designed for use in an Ant build system. It defines a custom task that generates a report on the detected test requirements.
Ideally you should add it to your Continuous Integration build process so that all members of your team can benefit from the tool.
Step 1: Add JTestConnect.jar to your project
Go to the SourceForge page and download the jar distribution. Put this somewhere on your classpath.
Step 2: Get Antlr runtime
Ant needs an Antlr runtime for the jtestconnect task to run. Download it here and save it to your computer.
If you are invoking Ant from the command line, then you can tell Ant where to find needed JAR files by invoking it as follows:
ant -lib path/to/jars/
If you are using Ant from inside Eclipse, you can add the Antlr runtime to the Ant classpath.
Go to Window -> Preferences and then to Ant -> Runtime :
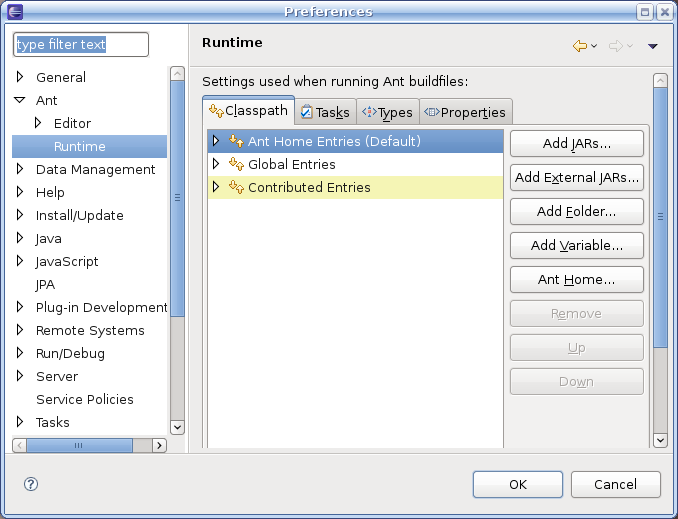
Select the Classpath tab and select Ant Home Entries .
Click Add JAR... and select the Antlr runtime jar file. If you did not save the runtime jar in one of your project directories you will need to use the Add External JARS... button instead.
Step 3: Declare Ant Task
Add the following code to the top of your Ant build script. The classpath should point to the JTestConnect jar file download in step 1.
<taskdef resource="JTestConnect.properties" classpath="path/to/jtestconnect.jar"/>
Step 4: Configure Default Behavior (jtestconnect.xml)
To make annotations as simple as possible JTestConnect allows the default behavior to be configured. Once this is configured, we only need to include exceptions to the rule in our annotations.
The default naming scheme must be defined in an XML file named jtestconnect.xml.
The following is a simple (and suggested) jtestconnect.xml file.
<!-- Configures JTestConnect -->
<jtestconnect>

	<defaults>
		<property name="package" value=""/>
		<property name="classPrefix" value=""/>
		<property name="classSuffix" value="Test"/>
		<property name="methodPrefix" value="test"/>
		<property name="methodSuffix" value=""/>
	</defaults>

</jtestconnect>
This configuration states that a method myMethod in class MyClass will be tested by a method called testMyMethod in class MyClassTest.
A description of this file can be found here.
Step 5: Create Ant Target
Not it is time to actually perform the check. An example Ant task is below:
<target name="checkTestRequirements">
    <jtestconnect testsrcpath="path/to/test/src" configfile="config/jtestconnect.xml"
         	failureproperty="testconnect.failure">
		<fileset dir="path/to/production/src">
			<include name="**/*.java"/>
		</fileset>
    </jtestconnect>

    <fail message="unsatisfied test requirements" if="testconnect.failure"/>

</target>
This Ant task uses the newly declared jtestconnect task to perform a test on the code. The following should be noted:
- testsrcpath - This should point to the directory containing the source code for your tests.
- configfile - Points to the configuration file (see Step 4).
- failureproperty - If errors are present, JTestConnect will set this property. You can use it to delay failing the build until all modules have been checked using JTestConnect. You can also just ignore it if your don't want to fail the build.
The fileset child element describes the code that jtestconnect should generate and check test requirement for (i.e. your production code).
fail causes our build to fail if the failureproperty was set.
Step 6: Start Annotating Classes
Now you are all set up and ready to go. Every time a developer writes a piece of code, that is non trivial, the method should be annotated and linked to its test.
Whenever a developer comes back to visit a class, they will immediately see which methods have associated tests. If a test is deleted of it test code is changed we can always be sure that our code remains correctly tested (otherwise our build will fail).
To find about how to define rules please continue to the next page.